
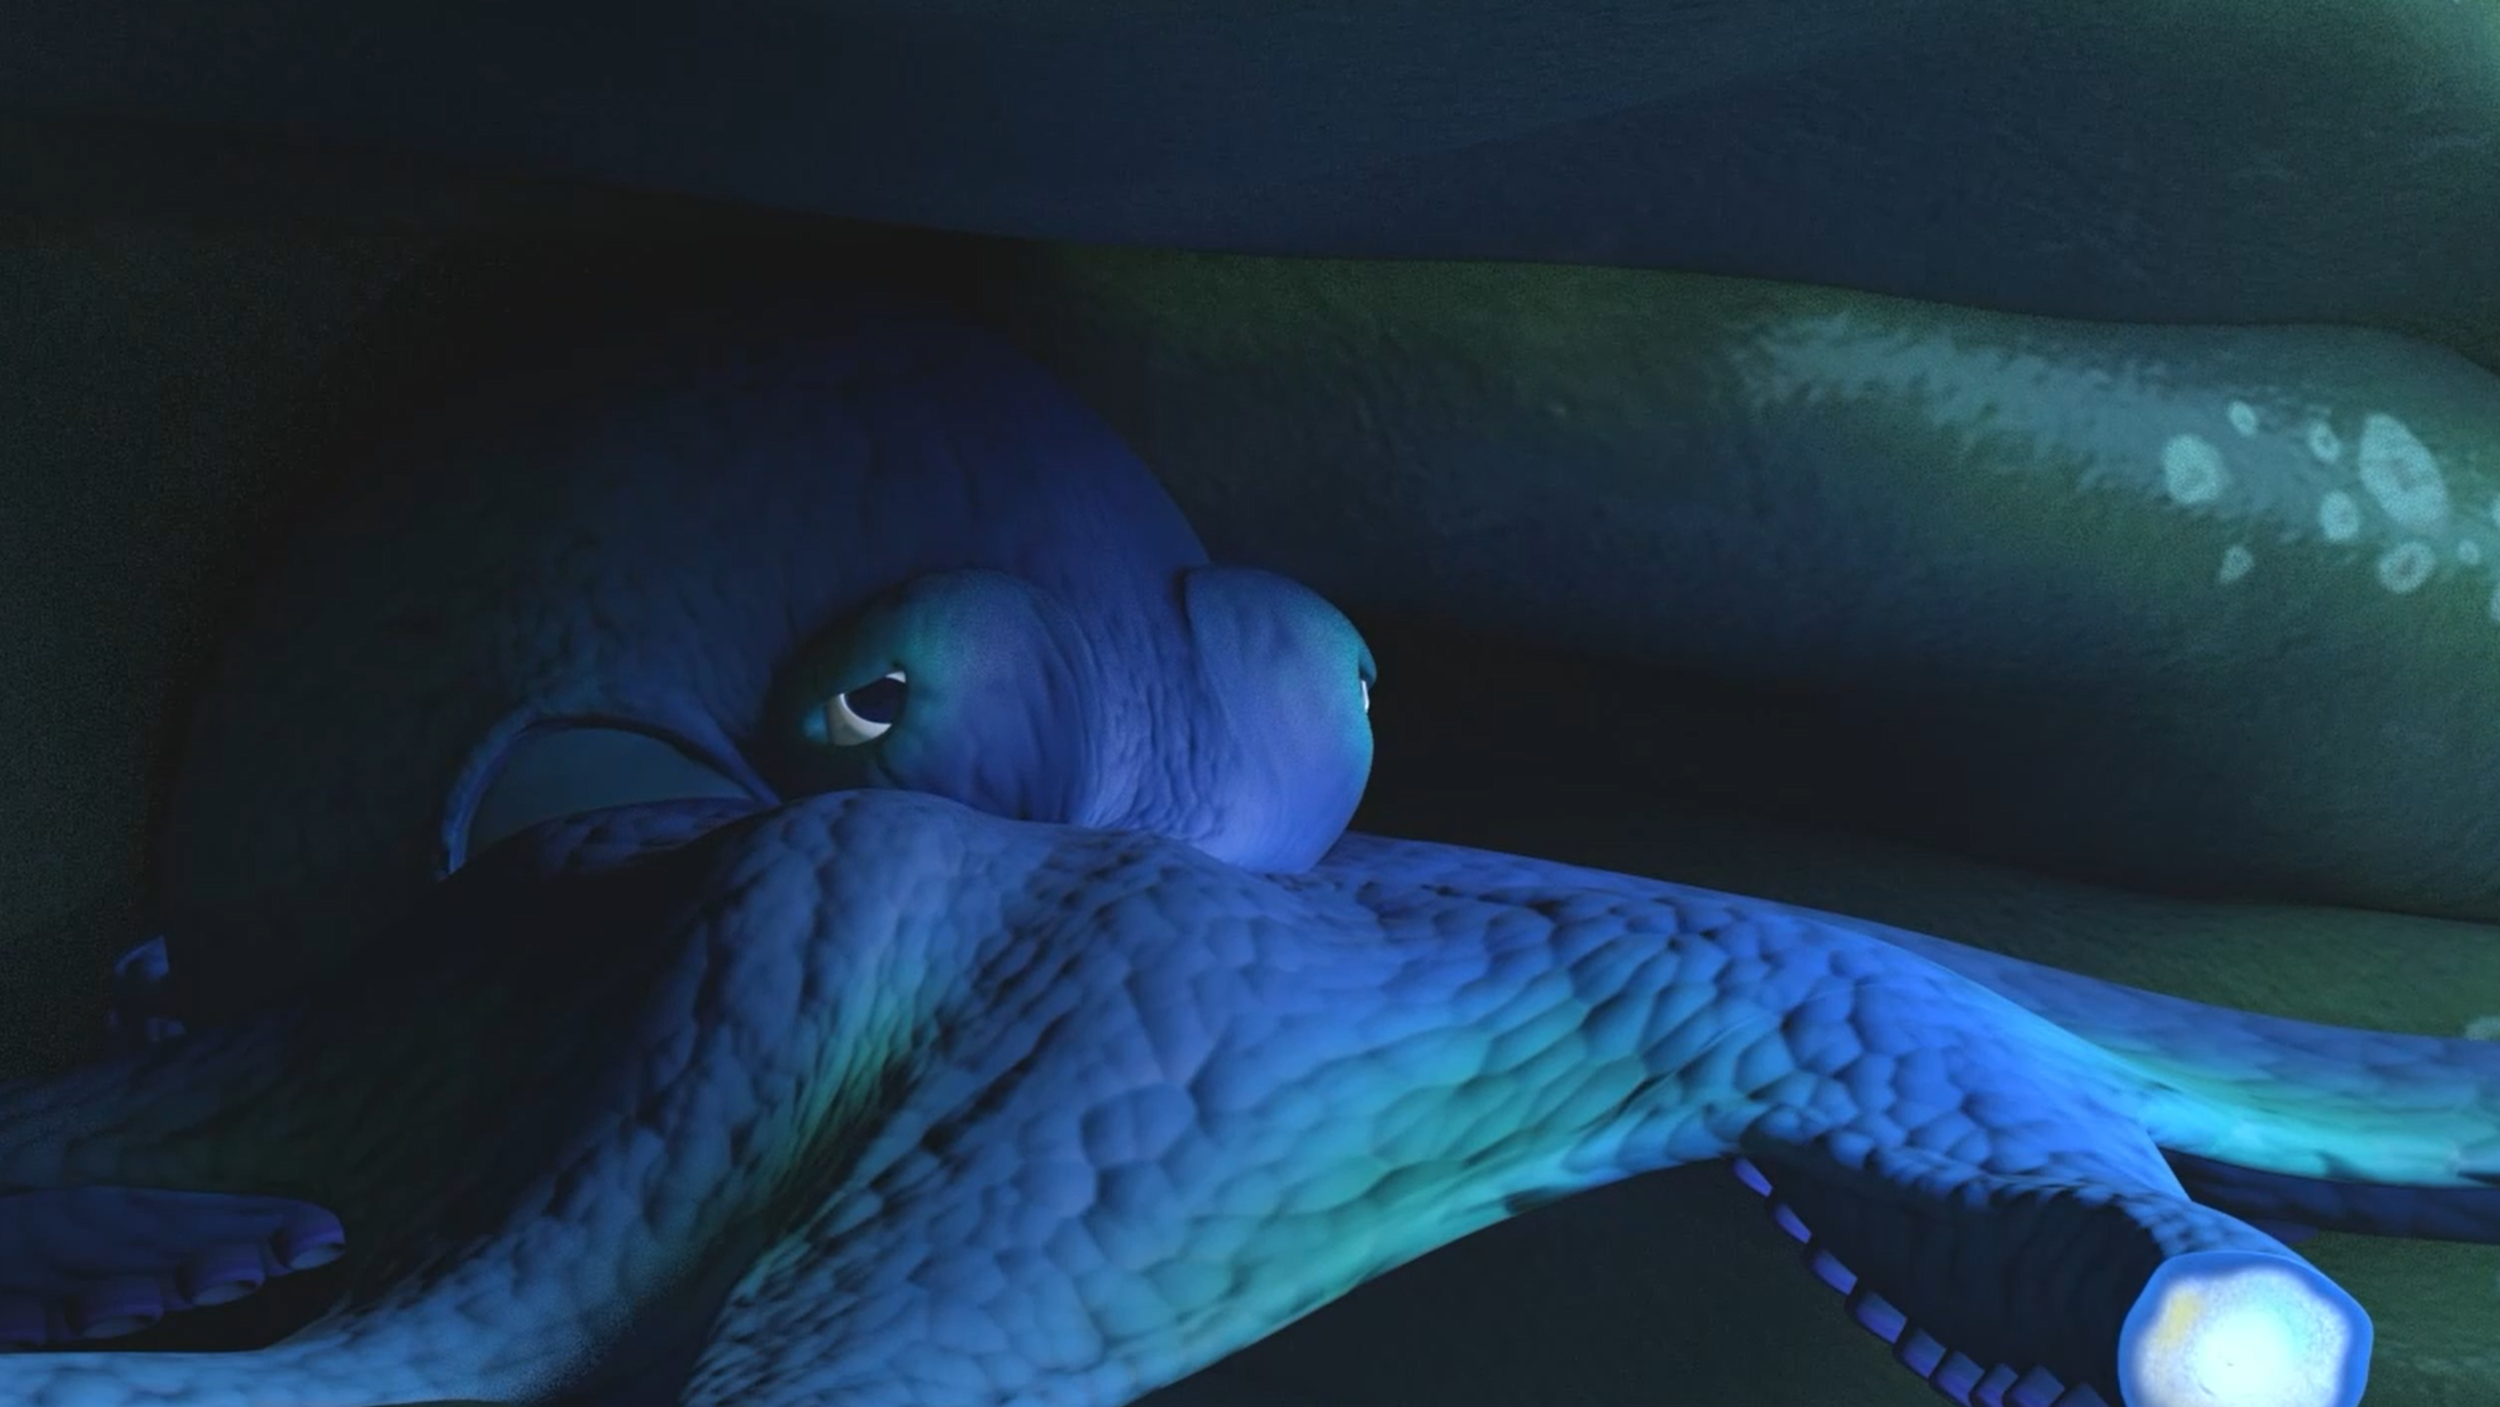
Eleanor
Eleanor the octopus
June 2021 - I was part of the 2021 Paul G. Allen School of CSE Animation Capstone program— a year-long course emulating an animated film production pipeline while focused on teamwork and skill development. By the end, our team of 14 students, 4 TAs, 2 staff members and 1 professor produced a short film about Eleanor the octopus. This page reviews my contributions to the film and some of the awesome tools and techniques I learned along the way.


The color-shifting system: One of the coolest things I’ve ever worked on
It all started when I received an email from Barbara (the professor) containing this video and something along the lines of “can we make the octopus do this?” She was referring to the way the octopus’ change in color looks like a wave washing over its body, the strongest examples being at 0:43 and 2:40. Having Eleanor change color was already developing into a critical element of the film, specifically for aiding the visual communication of how she’s feeling. At this point she simply interpolated from one texture to the next— one phasing in uniformly over the other like clicking and dragging an opacity slider. My initial reaction: “absolutely not," and that was that. The end.
Just kidding. This is the exact level of challenge where I thrive. This felt so far beyond my understanding, borderline impossible, but a tiny spark of an idea kept the dream alive that it could be done.

Layered Texture-ception
Enter: the most efficient meeting I have ever been a part of. Cody, Emily, and I jumped into a Zoom where I proceeded to outline exactly how I thought the system could work, drawing the above diagram as I spoke to keep everyone on the same page.
On the left: I learned earlier in the year about layered textures— we were already using one for Eleanor’s current color shift— but I didn’t see anything preventing us from nesting them. I explained this and dubbed it Layered Texture-ception.
In the middle: the user interface. How would the animator be able to go from node 1 to 4 without 2 and 3 getting in the way? I didn’t know how the exact code would be written, but I outlined a system for how the user could interact with the nodes simply by turning two of them “on” and moving between them using a slider. One technical layer deeper, the red numbers labeled on/off in the channel box directly control which branch of Layered Texture-ception Maya will look for the texture in.
On the right: the masks. If somehow we could create a 2D animation of black and white masks that tells the new texture where to show up on top of the old, then link that to our slider, we will have accomplished the wave effect and the process will be fully automatic. The abstraction is maintained for the user to just understand the two active textures and a slider.
I compare this meeting to a round of Olympic table tennis. We rallied this idea back and forth so fast that we could barely keep up with ourselves, clarifying, ironing out the logic and accounting for pitfalls. 45 minutes later we adjourned, each with a task suited to our specific skills. Cody set out to program Layered texture-ception and its interface, Emily to figure out how to animate the masks, and I to design the masks and the underlying octopus textures.

Eleanor's joyful texture

Eleanor's neutral texture

Eleanor's sad texture
Eleanor's fearful texture

Eleanor's determined texture

Eleanor's kelp camo texture

Eleanor's surprised texture

Eleanor's curious texture

Eleanor's rock camo texture

Eleanor's normal map

Eleanor's roughness map


To create the masks and the colors I used the Substance Painter file I’d already built for Eleanor’s neutral color. First I turned every color in the file to pure black— a black mask, 100% old color. Then, with careful review of the reference video, I turned sections of the texture white and exported it frame by frame to create the wave effect until I reached a totally white mask, 100% new color.
One of the things I noticed in the reference video and from up-close footage of an octopus’ chromatophores was that the color shift travels not only over the body like a wave, but originates from each cell-like bump on the octopus’ body. Like pixels! I had outfitted the Substance Painter file with a bunch of features for fine adjustment, one of which specifically allowed for graduating colors originating from the center of each cell that could be used for exactly this purpose. It turned out really nice.
A render of Eleanor featuring the color shift tool
This is one of my favorite things I’ve ever worked on. It looks so cool— Cody, Emily and I freaked out when we saw it in renders for the first time. And as I mentioned at the beginning of this section, it was right in my goldilocks zone of challenge— wildly ambitious, but not impossible. It pushed my current understanding of Maya and Substance Painter to the absolute limit.
While the result was extremely satisfying, my favorite part of working on this was the teamwork. Each of us brought something unique and indispensable to the table. By putting our heads together we were able to accomplish something that none of us could have done alone (except Cody, he could have done it alone but at the expense of his sanity). On top of that, the comradery and support we provided each other as we encountered hurdles was really refreshing and motivating. I’m really looking forward to having more experiences like this in my career.
Substance painter: the right tool for the job
Before the capstone I had never touched Substance Painter. I actually kind of dreaded texturing because no matter how well I hid the seams , they would always show up on my hand-painted models. On top of that, the creation of roughness, metalness, emissive and normal maps absolutely mystified me. How could someone ever reach a level of detail that high by hand? But after I saw it as a nice-to-have skill on some 3D Artist positions I asked if we could cover it in class for one of our Thursday tech demos.
I was mesmerized immediately. It solved literally every gripe I’d ever had with texturing— I could paint directly on the model, I didn’t have to worry about seams as much, fill-layers allowed me to try radically different ideas at breakneck pace, and all I had to do to generate height information, metalness, emission, etc. was make a few masks, adjust a few sliders and hit ‘export.’ Being able to reach the level of detail I saw in the games I play and the movies I watch finally felt doable.
So I dove in:

The neutral texture - the basis for all the others

Curiosity V1

Curiosity V2

Curiosity V3

Curiosity V4

Curiosity V5

Curiosity V6

Determination V1

Determination V2

Determination V3

Determination V4

Determination V5

Determination V6

Fear V1

Fear V2

Fear V3

Joy V1

Joy V2

Joy V3

Joy V4

Joy V5

Kelp Camo V1

Kelp Camo V2

Kelp Camo V3

Rock Camo V1

Sadness V1

Sadness V2

Sadness V3

Sadness V4

Surprise V1

Surprise V2

Surprise V3

Surprise V4

Surprise V5

Surprise V6
I produced a new neutral texture for Eleanor over the course of two weeks, tinkering with the program and digging into every nook and cranny of its features that I came across. It was an absolute blast and I became absolutely enamored with texturing.
Eleanor’s neutral texture was extremely well received, but the best part was the rest of her textures. I set up the file so that I was able to produce every other texture for her emotions by making a copy of it then changing the colors and adding a few features. A task that would have taken hundreds of man-hours by hand suddenly was something I could do in an afternoon. It doesn’t stop there— every one of the emotion textures went through three to six iterations as I worked with the director (professor) to refine them to her evolving vision for them.
I used Substance Painter for every asset I textured in the capstone.
The vision for the textures in this film demanded a more advanced method of production than hand-painted textures. Substance Painter was worth every minute I spent learning it. I helped teach the rest of the team and we used it for most of the other assets as well, which led to a real visual upgrade for a capstone film. Using intricate roughness and normal maps really took the it up a level.
I am really excited to keep using Substance Painter and programs like it in my career.
Modeling in Maya
I co-lead the modeling team for the film and my excitement for modeling never slowed down over the course of the year. I loved receiving a piece of concept art then meticulously constructing and sculpting it Maya, until it matched. I pushed my ability beyond its limit by getting faster, finding shortcuts, and solidifying concepts like quad-drawing and retopology. I also learned how to present my models (and iterations of them) to the people I work for— using rendered turntables to provide a complete picture of them. I really enjoyed thinking about how to optimize the turntable (the placement of the models, the poses they were in, etc.) to best communicate what I had made.


An example of how I present my models
Animating A nightmare
I ended up doing the motion for only a handful of shots in the film, but I did request one “challenging” shot because I really wanted to give animation a real college try. I was assigned nightmare_500, the shot where Eleanor is pursued by her nightmare manifestation of the shark. It took me a long time to get it right— I went through over 20 iterations, applying feedback from the director and staff on each pass while trying to make it really achieve a feeling of terror. I attempted to incorporate as many of the Principles of Animation as I could, some of the most prevalent being anticipation, squash and stretch, staging, overlap, arcs, and solid timing. If I were to touch it again I think it could be improved by adding more secondary motion and exaggeration. Overall, I’m very proud of it.
Developing expressions for an octopus
In summer 2020 I took the optional capstone course on facial expressions taught by industry expert Gary Faigin. I learned that since the human face is how we interface with the emotions of others, good facial expressions are a critical driver of your story in film. We spent 5 weeks covering the six cardinal expressions: Joy, Sadness, Anger, Fear, Disgust, and Surprise, or as I prefer to think of them: the characters from Inside Out and their estranged cousin.
Each came with a rubric outlining THE qualities of each expression across every feature of the human face— every detail from the position of the eyebrows to the amount of sclera (eye white) you could see to exactly how taut the top and bottom lips where. Each facial feature— the brows, the eyes, the mouth and the nose— is a key differentiator between the cardinal expressions and all the mixed emotions between them. My secret strategy for the assignments was taking a picture of my face making the expression, posing it fittingly on the character, reviewing it against the rubric, then banishing the reference image to the depths of my digital trash can, never to be seen again. It was a fascinating class and I did quite well in it.
As the sole student in the capstone who had taken the expressions class, I found myself the lead of a small team tasked with developing facial expressions for Eleanor. The thing about Eleanor is you have… eyes. And nothing else. None of the other critical elements of each expression. Gary, now serving as an advisor for the film, was most displeased with this. But we persevered, using the facial controls to produce poses to the best of our ability. We’d then send them off to Gary, who would return them with feedback and notes about our varying levels of success:
Surprise
Pretty successful, mostly positive feedback! A positive reaction from Gary is pure ecstasy.
Fear
Moderately successful, needs some more substantial tweaks but definitely could work.
Disgust, the first and only attempt
“Eeehhhhhh… not so good.” - Gary
We continued to iterate and refine them. We canned disgust and replaced it with the more inherent octopus emotion of curiosity, since that would be more useful for our story. And since Eleanor never experiences raw anger in the film, we rebranded it as determination. During this process we also came up with the idea of using her color shifts to aid how we convey her emotion. Finally we reached a set of expressions that we thought would get the job done. We uploaded them to the pose library and made resources for the motion team to reference while applying them to the film, including a reference reel and a style guide.
Developing Eleanor’s expressions is one of the most difficult creative challenges I’ve ever undertaken. It felt so open— there genuinely was no right answer and we just had to try things and see what worked. I’m proud of what we were able to accomplish.
The style guide I developed for the team to use when posing Eleanor’s expressions. Adobe Illustrator.
The reference reel, based on the rubrics I found extremely useful in the expressions class.
An early prototype of using her textures to assist her expressions. Pre-color-shifting system. Rest in peace to the entire night of sleep Emily and I lost to surfing 8 remote desktops at once trying to batch render this in time for the fresh-eyes screening.
Capturing the vibe
The professor was a strong proponent of making as many reference videos as necessary to get every member of the production team on the same page. One of the more interesting ones I worked on was called the “mood reel,” where the task was to craft the feeling of every moment in the movie using any combination of media (photos, videos, music, etc.) Essentially the reel exists to intentionally identify emotional highs and lows of our story and and define the progression of feelings that take us from one to the next. How we feel while watching a given moment in the film should match how we feel when watching the associate moment in this video.
Hopefully that makes sense. I think how difficult I’ve found it to explain this in writing is a testament to the abstract nature of the task. It really stretched my big picture thinking of the story and develop a really deep understanding of it. This allowed me to come up with better ideas to support it and served as an excellent guide when working in the weeds of smaller details.
Finally, I really enjoyed this task because it allowed me to put my immense mental database of video game and movie soundtracks to good use. Let it be known a version exists with music exclusively from Destiny, Star Wars, and The Last of Us Part II.
Visualizing the shark (regular & nightmare)

Nightmare Version 3

Nightmare Version 4

Nightmare Version 5

Nightmare Version 6

Nightmare Version 7

Nightmare Version 7 w/ studies

Nightmare Version 2

Regular Shark Version 2

Regular Shark Version 3

Regular Shark Version 4

Regular Shark Version 7
I worked as part of a small group of concept artists to conceptualize the antagonist of our film: the shark. The director (professor) gave us the initial parameters that it had to be based on a pacific sleeper shark and that we needed to come up with a normal and nightmare version. Each day I came prepared with a new iteration of each that applied the previous day’s feedback, then took extensive notes on what the director said she wanted to see in the next. Sometimes this was to apply something she liked from another teammate’s drawing. We went through about seven iterations before settling on a design to send down the pipeline.

For my design of the nightmare shark, I first brainstormed how it could strongest relate to the story, which literally started as a page with a bunch of random words on it in my I’m-not-trying-for-this-to-be-legible handwriting. This mental stone-skipping helped me come up with the idea that since the shark takes Eleanor’s arm in the film, a fitting nightmare manifestation is an abomination of shark and tentacle now that she associates them. And not just one tentacle, many, as she also fears that it will come back for more. The director was also excited about this idea and instructed me to take it further.
I am really satisfied with the final design of the shark, it turned out as a mash-up between every member of the team’s design as well as some final additions by the staff. I am also really excited about how much better I got at digital drawing throughout this process.
A model of my head (bald) - CSE 458
This was definitely my favorite assignment we did fall quarter. We learned about facial topology and placing poles properly to set the model up for natural deformation. Using my own head was extra credit and I thought that sounded fun, so I had my roommate take front and side pictures of my head and used those for reference. Adding ears was also extra credit, but I was having such a good time with it that I did those as well. Connecting the ears to the head wasn’t in the assignment but I was enjoying it so much I went ahead and did that too. In other words, I really like modeling.
Another thing I found so enjoyable about this assignment was how well the knowledge from the figure drawing class I took in the spring applied. About halfway through this model something was just not looking right about it and minor tweaks weren’t fixing it. Then I remembered the tip from that class that things often turn out better when you think about the underlying bone and muscle structures, so I revised the model with the objective of making it look like it had a skull inside it. It ended up looking like Jim Carrey in The Mask, but watering down the features from there did the trick.
I really hope I don’t go bald anytime soon.
Mouse bounce - CSE 458
This assignment was more practice with the principles of animation. For this mouse I focused especially on anticipation, squash & stretch, and overlap. I also really enjoyed adding subtleties to the motion that breathe life into the character, like the little shake it does to psych itself up before the jump.
The outtakes
I fulfilled the responsibilities of my final lead position in the capstone with no time to spare: the outtakes. I didn’t procrastinate it per se… it had just been a mental backburner item until I had literally just enough time left in the course to make it: the six hours before the premiere showing. We had spent the year assembling outtakes— funny technical glitches, footage of our socially distanced meetup where we goofed around asking things on campus where the animation lab was, and, the only silver lining of having class on Zoom, every moment of the course had been recorded. I had the entire thing edited in my head— I knew Ocean Man would be the perfect musical pairing— I just had to sit down and do it for real. After six hours of probably the most focused I have ever been, this masterpiece was born.
There’s always room for comedy. Even though we spent the entire year remote, these moments were still able to happen. Watching the class cry with laughter was one of my highlight moments of the year.